
Page 708 - Demo
P. 708
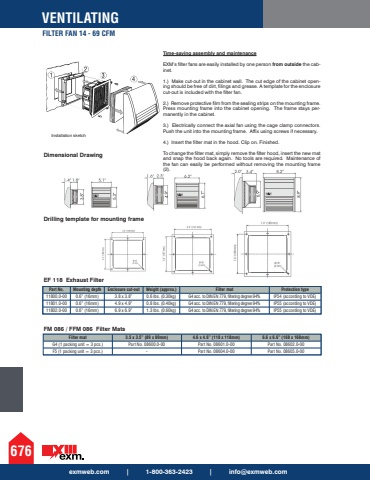
exmweb.com | 1-800-363-2423 | [email protected] FAN 14 - 69 CFM676Installation sketchDimensional DrawingFilter mat 3.5 x 3.5%u201d (89 x 89mm) 4.6 x 4.6%u201d (118 x 118mm) 6.6 x 6.6%u201d (168 x 168mm)G4 (1 packing unit = 3 pcs.) Part No. 08600.0-00 Part No. 08601.0-00 Part No. 08602.0-00F5 (1 packing unit = 3 pcs.) - Part No. 08604.0-00 Part No. 08605.0-00Part No. Mounting depth Enclosure cut-out Weight (approx.) Filter mat Protection type11800.0-00 0.6%u201d (16mm) 3.8 x 3.8%u201d 0.6 lbs. (0.30kg) G4 acc. to DIN EN 779, filtering degree 94% IP54 (according to VDE)11801.0-00 0.6%u201d (16mm) 4.9 x 4.9%u201d 0.8 lbs. (0.40kg) G4 acc. to DIN EN 779, filtering degree 94% IP55 (according to VDE)11802.0-00 0.6%u201d (16mm) 6.9 x 6.9%u201d 1.3 lbs. (0.60kg) G4 acc. to DIN EN 779, filtering degree 94% IP55 (according to VDE)Drilling template for mounting frameEF 118 Exhaust FilterFM 086 / FFM 086 Filter MatsTime-saving assembly and maintenanceEXM%u2019s filter fans are easily installed by one person from outside the cabinet. 1.) Make cut-out in the cabinet wall. The cut edge of the cabinet opening should be free of dirt, filings and grease. A template for the enclosure cut-out is included with the filter fan. 2.) Remove protective film from the sealing strips on the mounting frame. Press mounting frame into the cabinet opening. The frame stays permanently in the cabinet. 3.) Electrically connect the axial fan using the cage clamp connectors. Push the unit into the mounting frame. Affix using screws if necessary. 4.) Insert the filter mat in the hood. Clip on. Finished. To change the filter mat, simply remove the filter hood, insert the new mat and snap the hood back again. No tools are required. Maintenance of the fan can easily be performed without removing the mounting frame (2).
